小程序
text
wxace4bed0740e0458text
9d08d98c557d36d350edbe9c6aa26fbe页面组成部分
- js:页面逻辑
- wxml:页面结构
- wxss:页面样式
- json:页面配置
两种渲染模式
- Skyline,
- wibview
- 通过app.json切换
- 删除
renderer、rendererOptions、componentFramework
生成页面
- 手动 +
- app.json增加pages自动生成文件
window配置
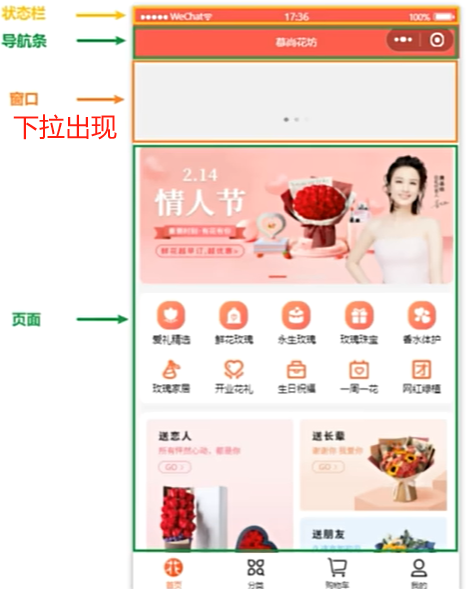
app.json或者page里的jsonwindow配置代码
json{ "window": { "navigationBarTitleText":"你好小程序", //导航条 文本 "navigationBarBackgroundColor":"#f3514f",//导航条 背景色 "navigationBarTextStyle": "black",//导航条 文本 "enablePullDownRefresh": true,//允许下拉刷新,出现“窗口” "backgroundColor":"#668B8B", // 窗口背景色 "backgroundTextStyle":"dark"// 窗口字体亮/暗 } }去除导航条
txt"navigationStyle": "custom"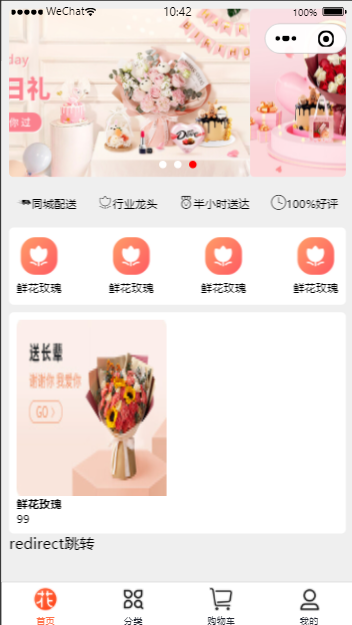
tabbar配置
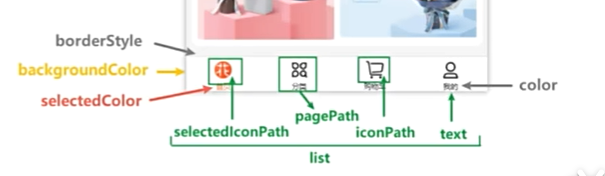
app.json或者page里的jsontabbar配置代码
json{ "tabBar": { "color": "#252933", "selectedColor": "#FF734C", "backgroundColor": "#ffffff", "borderStyle": "black", "position": "bottom", "list": [ { "pagePath": "pages/index/index", "text": "首页", "iconPath": "assets/tabbar/index.png", "selectedIconPath": "assets/tabbar/index-active.png" }, { "pagePath": "pages/cate/cate", "text": "分类", "iconPath": "assets/tabbar/cate.png", "selectedIconPath": "assets/tabbar/cate-active.png" }, { "pagePath": "pages/list/list", "text": "购物车", "iconPath": "assets/tabbar/cart.png", "selectedIconPath": "assets/tabbar/cart-active.png" }, { "pagePath": "pages/profile/profile", "text": "我的", "iconPath": "assets/tabbar/my.png", "selectedIconPath": "assets/tabbar/my-active.png" } ] } }scss配置
project.config.jsonprojec.config配置scss
json{ "setting": { "useCompilerPlugins": [ "sass" ] } }微信索引
sitemap.json允许所有
json{ "rules": [{ "action": "allow", "page": "*" }] }除了index页面,其他都可以
json{ "rules": [{ "action": "disallow", "page": "pages/index/index" }] }只允许index页面,其他都不可以
json{ "rules": [{ "action": "allow", "page": "pages/index/index" }] }样式
- 屏幕宽度都是750rpx
- 可使用px、vh
- 以
ipone6作为视觉稿标准- ipone6是375px
- 1px = 2rpx
- 量多少px就写多少rpx
- 全局样式将
app.wxss改为app.scss,局部>全局
轮播图

代码11
html<view class="swiper"> <swiper autoplay="true" circular="true" indicator-dots="true" indicator-color="#fff" indicator-active-color="red"> <swiper-item><image src="../../assets/floor/banner-1.jpg" mode="scaleToFill" show-menu-by-longpress="true"></image></swiper-item> <swiper-item><image src="../../assets/floor/banner-2.jpg" mode="scaleToFill" show-menu-by-longpress="true"></image></swiper-item> <swiper-item><image src="../../assets/floor/banner-3.jpg" mode="scaleToFill" show-menu-by-longpress="true"></image></swiper-item> </swiper> </view>scss.swiper{ swiper{ height: 360rpx; } swiper-item{ image{ width: 100%; height: 100%; } } }图片
1. 可分享
html<image src="../../assets/floor/banner-1.jpg" mode="aspectFit" show-menu-by-longpress="true"></image>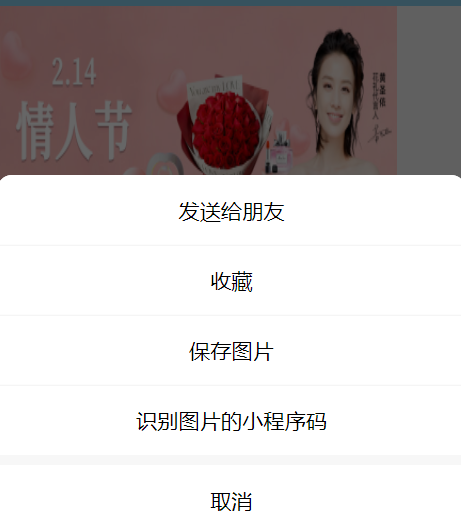
2. 拉伸平铺
html<image src="../../assets/floor/banner-1.jpg" mode="scaleToFill" show-menu-by-longpress="true"></image>
3. 等比缩放
html<image src="../../assets/floor/banner-1.jpg" mode="aspectFit" show-menu-by-longpress="true"></image>
4、懒加载
必须放在最后html<image src="../../assets/floor/banner-1.jpg" mode="aspectFit" show-menu-by-longpress="true" lazy-load></image>文本
可复制user-select、保留空格spacehtml<text user-select="true" space="nbsp">文 本</text>路由跳转
1:跳“非tabbar”路由,“有返回”箭头
html<navigator url="/pages/test/test" open-type="navigate">navigate跳转</navigator>jswx.navigateTo({ url:"/pages/test/test?id=1&name=tom", })2:跳“非tabbar”路由,“没有返回”箭头,“只有home”图标
html<navigator url="/pages/test/test" open-type="redirect">redirect跳转</navigator>jswx.redirectTo({ url:"/pages/test/test?id=11&name=tom1", })3:只能跳“tabbar”,“没有返回”箭头,“没有home”图标
html<navigator url="/pages/list/list" open-type="switchTab">switchTab跳转</navigator>jswx.switchTab({ //不可使用?传值 url:"/pages/index/index?id=21&name=2tom", url:"/pages/index/index", })4:都能跳,“没有返回”箭头,“只有home”图标
html<navigator url="/pages/test/test" open-type="reLaunch">reLaunch跳转</navigator>jswx.reLaunch({ url:"/pages/index/index?id=31&name=3tom", })5:路由返回1层
html<navigator open-type="navigateBack" delta="1">reLaunch跳转</navigator>jswx.navigateBack({ delta: 1 })scroll-view
横向滚动
html<scroll-view class="scroll-x" scroll-x> <view> <view class="good-item"> <image src="../../assets/floor/elder.jpg"></image> <text>鲜花玫瑰</text> <text>99</text> </view> </view> </scroll-view>scss.scroll-x{ width: 100%; white-space: nowrap; view{ display: inline-block; width:320rpx; height:440rpx; margin-right: 16rpx; .good-item{ display: flex; flex-direction: column; justify-content: space-between; text{ &:nth-of-type(1){ font-weight: bold; } } } image{ width: 100%; height: 100%; } &:last-child{ margin-right: 0rpx; } } }竖向滚动
html<scroll-view class="scroll-y" scroll-y> <view>1</view> <view>2</view> <view>3</view> </scroll-view>scss.scroll-y{ height: 400rpx; view{ height: 400rpx; &:last-child{ background-color: lightcoral; } &:first-child{ background-color: lightseagreen; } } }上拉加载
- lower-threshold 底部100px,enable-back-to-top单击或双击顶部
html<scroll-view scroll-y class="scroll-y" lower-threshold="100" bindscrolltolower="getMore" enable-back-to-top="{{true}}" > <view wx:for="{{numList}}" wx:key="index" wx:for-item="item" wx:for-index="index">{{item}}</view> </scroll-view>scss.scroll-y{ height: 100vh; } view{ height: 800rpx; display: flex; align-items: center; justify-content: center; }jsgetMore() { wx.showLoading({ title:'数据加载中...', mask:true }) setTimeout(()=>{ const lastNum = this.data.numList[this.data.numList.length -1] const newArr = [lastNum+1,lastNum+2,lastNum+3]; this.setData({ numList:[...this.data.numList,...newArr] }) wx.hideLoading() },1000) },下拉刷新
- refresher-triggered是否收起加载
html<scroll-view scroll-y class="scroll-y" lower-threshold="100" bindscrolltolower="getMore" enable-back-to-top refresher-enabled="true" refresher-default-style="black" refresher-background="#ccc" bindrefresherrefresh="_bindref" refresher-triggered="{{isRefresh}}" > <view wx:for="{{numList}}" wx:key="index" wx:for-item="item" wx:for-index="index">{{item}}</view> </scroll-view>scssview{ height: 800rpx; display: flex; align-items: center; justify-content: center; } .scroll-y{ height: 110vh; }jsdata: { numList:[1,2,3], isRefresh: false, }, _bindref() { wx.showToast({ title:"下拉刷新。。。" }) this.setData({ numList:[1,2,3], isRefresh:false }) },icon字体
1.icon制作、2.引用icon1、icon制作
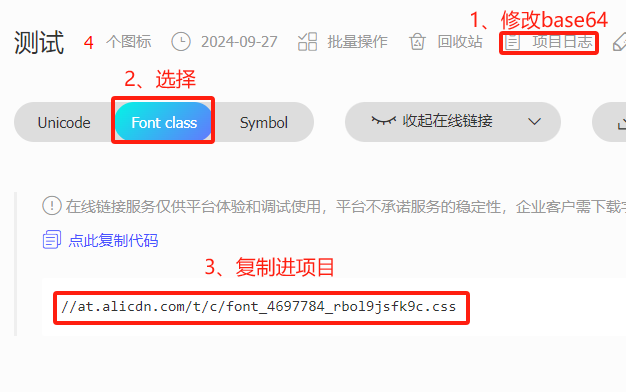
2.引用icon
- 新建文件,放入网站复制代码
- 全局引入
app.scssscss@import "./assets/iconfont"; - 代码使用html
<text class="iconfont icon-peisong"></text>
事件
点击事件、、获取input值、阻止冒泡、父给子值点击事件
html<button bind:tap="_c">按钮</button>获取input值
html<input type="text" bindinput="_i"/>js_i(e){ console.log(e.detail.value) }阻止冒泡
html<button catchtap="_c">按钮</button>父子传值
html<view bindtap="_v" mark:parId="22"> <button catchtap="_c" mark:id="11">按钮</button> </view>js_c(e){ console.log(e.mark.id) //11 console.log(e.mark.parId) //22 } _v(e){ console.log(e.mark.id) // undefined console.log(e.mark.parId) // 22 }wxml语法
1.绑定数据、2.修改数据、列表和条件渲染1:绑定数据
绑定变量
html<view>{{school}}</view> <view>{{obj.name}}</view>表达式:
加减、三元、判断html<view>{{num + 1}}</view> <view>{{num === 1 ? "等于1":"不等于1"}}</view> <view>{{num === 1}}</view>特殊:单独的boolean
html<checkbox checked="{{true}}"></checkbox>2-1:修改普通变量
js_c(){ this.setData({ num:this.data.num +1 }) }2-2:直接修改对象'obj.name'
js_c(){ this.setData({ 'obj.name':'tom' }) }2-4:展开符...修改对象
js//展开符 _c(){ const obj={ ...this.data.obj, name:'zhangsan' } this.setData({ obj }) }2-5:合并assign修改对象
js//合并符 _c(){ const obj = Object.assign( this.data.obj, {name:'张三'}, {age:18} ) this.setData({ obj }) }2-6:删除对象
js// delete删除 _c(){ delete this.data.obj.name this.setData({ obj:this.data.obj }) }js// ...删除 _c(){ const {name,...obj} = this.data.obj this.setData({ obj }) }3-1:修改数组
js_c(){ this.setData({ 'list[1]':11, 'listObj[0].name':'lisi' }) }
双向绑定,
不能对象、数组html<input type="text" model:value="{{inputV}}"></input>循环
html<view wx:for="{{obj}}" wx:key="index" wx:for-item="item" wx:for-index="index">{{index}}==>{{item}}</view>类似react<>
<block/>
判断
if判断
html<view wx:if="{{isFlag}}"> true </view> <view wx:else> false </view>hidden类似display控制
html<view hidden="{{isFlag}}"> true </view>版本更新
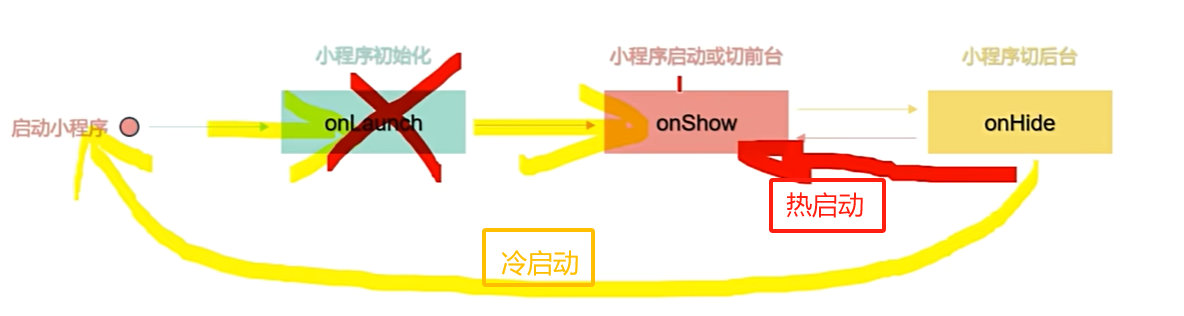
- 启动时同步更新:微信定期检查是否更新,下次启动会自动刚更新。长时间未使用会强制更新
- 启动时异步更新:冷启动都会检查,更新后等下次冷启动才可使用,当前为旧版本
app.js
jsonLaunch: function () { const updateManager = wx.getUpdateManager() updateManager.onUpdateReady(function(){ wx.showModal({ title: '更新提示', content: '新版本已准备好', complete: (res) => { if (res.confirm) { updateManager.applyUpdate } if (res.confirm) { } } }) }) }应用生命周期
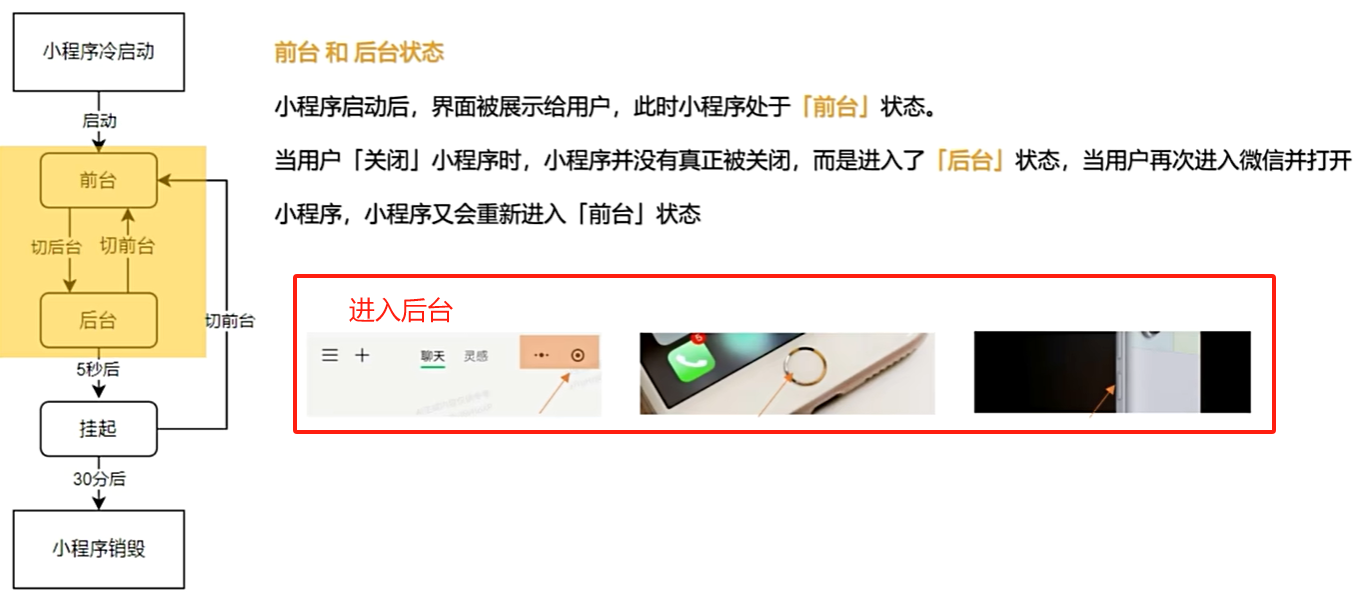
- 挂起:进入后台5秒,停止JS线程,播放音乐和位置可在后台运行,不会进入挂起
- 销毁:1、系统资源紧张;2、挂起30分钟,3、小程序占用资源过高。
页面生命周期
官网生命周期
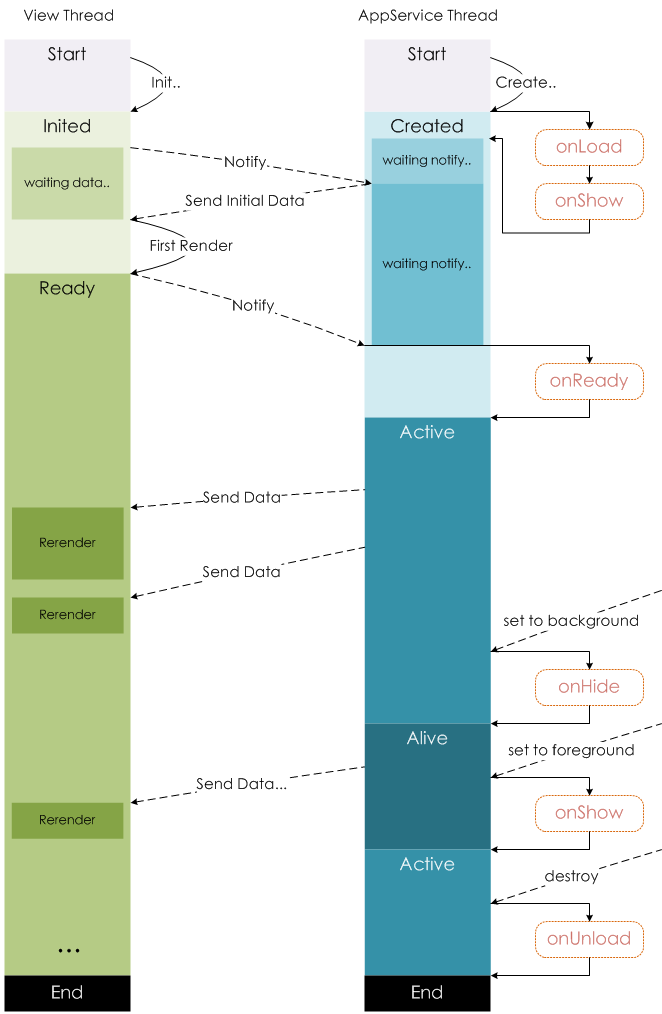
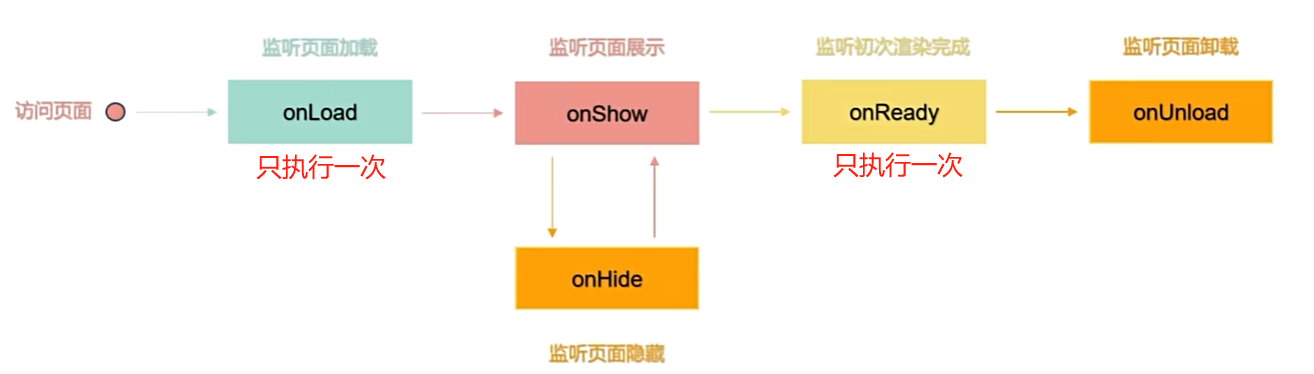
- navigate跳转,主页面onHide,返回子页面unload.
- tarbar跳转,跳转和返回都是onHide
- redirect和reLaunch都会unload之前页面,区别是redirect只unload上一个页面,reLaunch会把之前所有页面都unload
返回键,unload现在,返回到上一层onShowHome到index,先unLoad,再加载index- 应用进入
后台,页面也会onHide
小程序API分类
- 异步API
- wx.request({})
- 同步API
- Sync结尾(wx.setStorageSync())
- 事件监听API
- on开头(wx.onAppHide())
- 异步API
发起网络请求
- “右上角详情”->“本地配置”->“不校验合法域名”
request代码
jswx.request({ url: 'https://gmall-prod.atguigu.cn/mall-api/index/findBanner', method:'get', header:{}, data:{}, success:(res)=>{ console.log(res) }, fail:(err)=>{ console.log(err) }, complete:(res)=>{ console.log(res) } })全局弹窗,存储
loading
jswx.showLoading({ title: '数据加载中...', mask:true //蒙层阻止点击事件 }) wx.hideLoading()是否选择和轻提示
jsasync getData(){ const {confirm,cancel} = await wx.showModal({ title:'提示', content:'是否删除' }) if(confirm){ wx.showToast({ title:'删除成功', icon:'none', duration:1000 }) }else{ wx.showToast({ title:'已取消', icon:'error', duration:1000 }) } },同步存储
jswx.setStorageSync('key', {'name':"张三"}) wx.getStorageSync('key') wx.removeStorageSync('key') wx.clearStorageSync()异步存储
jswx.setStorage({ key:"key", data:{'name':"张三"} }) wx.getStorage({ key: 'key', success (res) { console.log(res.data) } }) wx.clearStorage() wx.removeStorage({ key: 'key', })上拉刷新,下拉刷新
上拉刷新
txt//page的json中配置距离底部100px触发onReachBottom,默认50 "onReachBottomDistance": 100jsonReachBottom() { wx.showLoading({ title:'数据加载中...', mask:true }) setTimeout(()=>{ const lastNum = this.data.numList[this.data.numList.length -1] const newArr = [lastNum+1,lastNum+2,lastNum+3]; this.setData({ numList:[...this.data.numList,...newArr] }) wx.hideLoading() },1000) },下拉刷新
txt"enablePullDownRefresh": true, "backgroundColor": "#000", "backgroundTextStyle": "dark"jsonPullDownRefresh() { this.setData({ numList:[1,2,3] }) console.log("下拉了"); //必做强制弹回 // if(this.data.numList.length === 3){ // wx.stopPullDownRefresh() // } },组件
1.基本使用
- json中配置(app、pages都可以)
text"usingComponents": { "custom-checkbox":"./components/custom-checkbox/custom-checkbox" }- 外部引用值
html<custom-checkbox label="我已经阅读了协议内容1" position="right"/>- 组件校验传进来的值
js// JSON类限制(String,Number,Boolean,Object,Array), // 不限制 null properties: { label:{ type:String, value:"" }, position:{ type:String, value:"right" } },- 获取和修改传进来的值
js_update(){ console.log(this.properties.label) this.setData({ label:"自己修改label" }) }插槽
js写法
txt// 开启多slot,默认不需要 options:{ multipleSlots: true },html<custom-checkbox> 我是slot <view slot="footer"><text>slot脚</text></view> <view slot="header"><text>slot头</text></view> </custom-checkbox>html<view> <slot/> <slot name="footer"/> <slot name="header"/> </view>组件样式穿透
styleIsolation样式隔离
- isolated开启隔离,默认
- 存在相同类名,不会互相影响
- apply-shared,页面影响组件,组件影响不了页面
- shared 页面和组件互相影响,修改原生比如checkbox样式需要用
txtstyleIsolation:shared- isolated开启隔离,默认
监听
- 父组件传值,监听会在onload之前执行一遍
组件中使用observers
js// 单个监听 num:function (newNum){ console.log(newNum) }js// 多个监听 "num,count":function (newNum,newCount){ console.log(newNum,newCount) }js// 对象监听 "obj.name":function (newNum){ console.log(newNum)// zhangsan }, "obj.**":function (newNum){ console.log(newNum) },js//数组监听 "arr[0]":function (newNum){ console.log(newNum) },js//父类properties传值监听,在 label:function(newN){ console.log(newN) }父子组件传值
子组件获取父组件的值
html<custom-checkbox proCheck="{{ischeck}}">jsproperties: { proCheck:{ type:Boolean, value:false } }, attached() { this.setData({ checked:this.properties.proCheck }) },父组件获取子组件的值,方法获取
父组件代码html<custom-checkbox bind:proEvent="getSonData"/>jsgetSonData(event){ console.log(event.detail)//获取子组件的值 },子组件代码html<button bindtap="sendData">给父类数据</button>jssendData(){ this.triggerEvent('proEvent',this.data.num) },父组件获取子组件的值,ref获取
html<custom-checkbox class="getRef"/> <button bindtap="getSonRef">getRef</button>jsgetSonRef(event){ const res = this.selectComponent('.getRef') console.log(res.data.num) },混入
Behavior
jsconst beh = Behavior({ data:{ behavior:"混合过来的值" } }) export default beh引入jsimport bef from "../../beh/behavior" Component({ behaviors:[bef] })page改为component
page改为component
txt//json配置 "usingComponents": {}jsComponent({ data:{ com:"改为com组件" }, methods:{ } })组件的生命周期
基本生命周期
常用jslifetimes:{ created(){ console.log(' 组件==>实例被创建时'); }, attached() { console.log(' 组件==>实例进入页面节点树时'); }, detached(){ console.log(' 组件==>实例被从页面节点树移除时执行'); } }, pageLifetimes: { show: function() { console.log(' 组件==>页面被展示'); }, hide: function() { console.log(' 组件==>页面被隐藏'); }, resize: function(size) { console.log(' 组件==>页面尺寸变化'); }, routeDone: function() { console.log(' 组件==>路由完成时'); } }不常用jslifetimes:{ ready(){ console.log(' 组件==>视图层布局完成后'); }, moved(){ console.log(' 组件==>实例被移动到节点树另一个位置时执行'); }, error(e){ console.log(' 组件==>抛出错误时执行'); }, },冷热加载
冷加载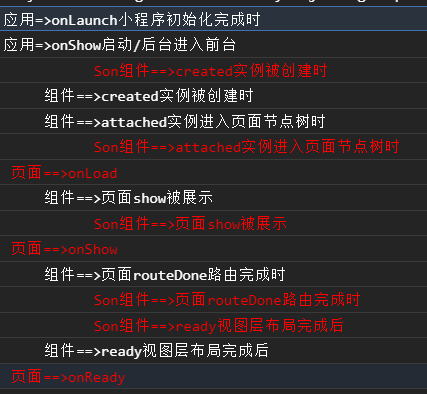
热加载 更改值没有生命周期
路由跳转
navigate跳转
navigate返回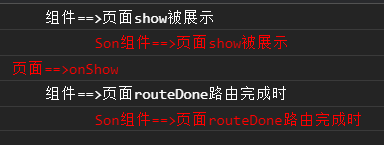
redirect跳转
切后台

组件继承外部样式class
基本使用
子类wxml文件html<view class="extend-class">子组件</view>子组件js文件jsexternalClasses: [ 'extend-class' ],父类wxmlhtml<custom-checkbox extend-class="test"/>父类scssscss.test{ color:red; }子类抢夺优先级
子类wxmlhtml<view class="extend-class import">子组件</view>子类scssscss.import{ color:yellow !important ; }使用vant+修改默认样式
使用vant
txtnpm init -y npm i @vant/weapp 执行:构建npmapp.jsonjson"usingComponents": { "van-button": "@vant/weapp/button/index" }修改vant样式
直接修改scss.van-button--primary{ color:red; background-color: red; }变量修改scss//app.scss定义 page{ --color:blue; }scss.van-button--primary{ color:var(--color); background-color: red; }分包处理
- 注意点:
- tarbar页面必须在主包内
- 最外层pages字段,属于主包的包含页面
- 主包不引用分包资源
- 分包可引用主包公共资源
- 分包与分包无法引用(异步化不受限制)
1.app.json
json"subPackages": [ { "root": "modules/cate", "name":"cate", "pages": [ "pages/list/list", "pages/cate/cate" ] } ]右上角详情=>本地代码-代码依赖分析
3.修改路由
html<navigator url="/modules/cate/pages/list/list" open-type="redirect">redirect跳转</navigator>- 注意点:
独立分包
- 独立于主包和分包
- 不需要加载主包
- 不依赖主/分包资源
- app.wxss对独立分包无效
app.json
json"subPackages": [ { "root": "modules/profile", "name":"profile", "pages": [ "pages/profile/profile" ], "independent": true } ]预下载包
- 控制台打印
preloadSubpackages: success - 主包name
app.json
json"preloadRule": { "pages/list/list":{ "network": "all", "packages": ["profile"]//包的name或root }, "pages/profile/profile":{ "network": "all", "packages": ["__APP__"] } }- 控制台打印
获取微信头像
- open-type 设置
chooseAvatar - bindchooseavatar 绑定事件
- 临时图片,需要存入资源库
获取微信头像代码
html<button open-type="chooseAvatar" bindchooseavatar="_bindref1">获取微信头像</button>js_bindref1(e){ const {avatarUrl} =e.detail//得到头像地址 }- open-type 设置
获取昵称
- type="nickname"
获取昵称代码
html<form bindsubmit="onSubmit"> <input type="nickname" name="nickname"/> <button type="primary" form-type="submit">获取昵称</button> </form>jsonSubmit(e){ console.log(e.detail.value.nickname) },分享功能
- 右上角分享
- 按钮分享
- 需要申请认证才可以支持功能
分享代码
jsPage({ onShareAppMessage(){ return{ title:'这是一个非常好的分享页面', path:"/pages/list/list.js", imageUrl:'./cate-1.png' } }, })html<button open-type="share">转发</button>转发朋友圈功能
- 分享功能 + onShareTimeline方法
转发朋友圈代码
jsPage({ onShareAppMessage(){ return{ title:'这是一个非常好的分享页面', path:"/pages/list/list.js", imageUrl:'./cate-1.png' } }, onShareTimeline(){ return{ title:'帮我', query:'id=1', imageUrl:'./cate-1.png' } }, })html<button open-type="share">转发</button>获取和验证手机号
- getPhoneNumber
- getRealtimePhoneNumber
获取手机号代码
html<button open-type="getPhoneNumber" bindgetphonenumber="getPhoneNumber">获取手机号</button>jsPage({ getPhoneNumber(e){ console.log(e) }, })验证手机号代码
html<button open-type="getRealtimePhoneNumber" bindgetrealtimephonenumber="getRealtimePhoneNumber">验证手机号</button>jsPage({ getRealtimePhoneNumber(e){ console.log(e) }, })客服接入
- 需要在管理端添加客服人员
html<button type="warn" open-type="contact">联系客服</button>全局存值类似cookie
- 全局存储使用
js写法
app.jsjsApp({ globalData:{ token:'' }, setToken(token){ this.globalData.token = token } })使用页面wxmlhtml<button bind:tap="setAppToken">存入token</button> <button bind:tap="getAppToken">获取token</button>使用页面jsjssetAppToken(){ console.log(appInstance) appInstance.setToken('我是token') }, getAppToken(){ const token = appInstance.globalData.token console.log(token) }父子页面跳转传值和回调
- 只能Page页面使用
js写法
父页面js_navito(){ wx.navigateTo({ url:"/pages/test/test", events:{ sonEvent:(res)=>{ console.log(res)//获取子页面的回调 } }, success(res){ //发给子页面的方法 res.eventChannel.emit('fatherEvent',{"fatherId":"01"}) } }) },子页面jsonLoad: function (options) { const eventChannel = this.getOpenerEventChannel() eventChannel.on('fatherEvent',(res)=>{ console.log(res) }) eventChannel.emit('sonEvent',{"sonId":"02"}) },txt{sonId: "02"}//先执行 {fatherId: "01"}全局store
- mobx-miniprogram创建store
- mobx-miniprogram-bindings关联store值和组件
- Page使用behavior,Compents直接使用
Compent使用Store
安装textnpm install --save mobx-miniprogram mobx-miniprogram-bindings2.创建storejsimport {observable,action} from 'mobx-miniprogram' export const numStore = observable({ numA:1, numB:2, update:action(function(){ this.numA += 1 this.numB += 1 }), //computed计算属性前面要加get,必须有返回值 get sum(){ return this.numA + this.numB } })3.组件使用html<view> <view>{{numA}}+{{numB}}={{sum}}</view> <button bind:tap="update">更新store数据</button> </view>jsimport { ComponentWithStore } from 'mobx-miniprogram-bindings' import {numStore} from '../../stores/numstore' ComponentWithStore({ storeBindings:{ store:numStore, fields:['numA','numB','sum'], actions:['update'] } })Page使用Store
创建behaviorsjsimport {BehaviorWithStore} from 'mobx-miniprogram-bindings' import {numStore} from '../stores/numstore' export const listBeh = BehaviorWithStore({ storeBindings:{ store:numStore, fields:['numA','numB','sum'], actions:['update'] } })pages引用jsimport {listBeh} from '../../beh/behavior' Page({ behaviors:[listBeh] })pages的wxml引用html<view overflow-> <view>{{numA}}+{{numB}}={{sum}}</view> <button bind:tap="update">page更新store数据</button> </view>fields和actions的不同写法
fields两种写法jsfields:{ nA:'numA', nB:'numB', sumA:'sum' }, //或者 fields:{ nA:()=>numStore.numA, nB:()=>numStore.numB, sumA:()=>numStore.sum },actionjsactions:{ updateData:'update' }多个aciton
- action的方法不能重复
jsimport {BehaviorWithStore} from 'mobx-miniprogram-bindings' import {numStore} from '../stores/numstore' import {testStore} from '../stores/teststore' export const listBeh = BehaviorWithStore({ storeBindings:[ { store:numStore, fields:{ nA:()=>numStore.numA, nB:()=>numStore.numB, sumA:()=>numStore.sum }, actions:{ updateData:'update' } }, { namespace:'testStore', store: testStore, fields:{ nA:()=>testStore.numA, nB:()=>testStore.numB, sumA:()=>testStore.sum }, actions:{ updateData1:'update' } }, ] })